Youth

Finding a Journal

Being one of those people who NEED pen and paper to pour out their hearts, owning the right journal to go with one's personality is essential. A trip to the bookstore might end up being disappointing because all they have stocked are sparkly, soft-cover notebooks that say "NOTEBOOK" at the top. Solution? Make your own journal.

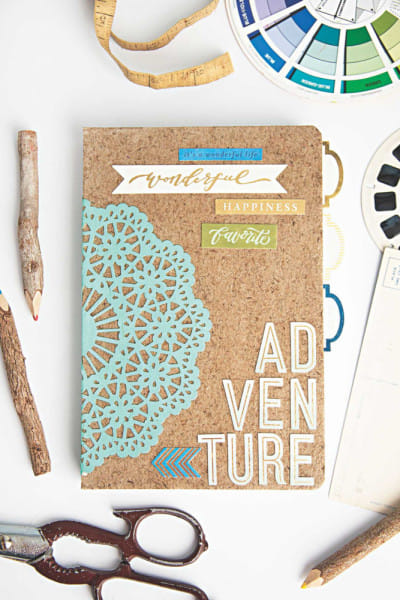
Here's what you will need: cardboard boxes (cereal boxes are preferable), scissors, fabric glue (glue gun works as well), ruler and decorative papers, colourful scraps of fabric or even picture cutouts for decoration.Firstly, dismantle all flaps of the box and get rid of them by cutting them out until you obtain the flat book cover look alike. There will be two spines of the box. You must cut out one. Adjust the size of the cover to your liking depending on how big or small you want it to be. Slather on some adhesive to the side you have to cover. Using a paintbrush to do so proved to be helpful as it eliminated all the air bubbles that would otherwise make the decorative bits look bumpy and also provided an even coat. Next, decorate the cover however you want: you could use decorative papers, scraps of faux fur, magazine cutouts or even paint it yourself for a deeper personalized look. For a dash of quirkiness, you could print out quote clouds, pictures, fonts, strips of washi tapes, just about anything that describes you so that you can stick it all over the cover.  After you're done painting a new face for your journal, place the ruler along the lines on either side of the spine, and fold the front and back of the cover to enable easy opening and closing of the journal. 

Time for some pages. Take out all the scraps of paper you've collected over the years - plain, colorful, oddly shaped, large, small, doesn't matter. You could paint a few pages or even print out different pictures on A4 size papers. Take 5 pages at a time and align them however you want to make a bundle of 10 pages by sewing them together in the middle. Make a couple of these bundles and sew them to the spine of the journal cover. Make sure you space them out evenly, otherwise the pages tend to tear. Add pockets in between pages to keep notes, memoirs or pictures. 

Now, for the final touches, add two pockets on either side of the flaps. You could stick embellishments of your choice on the front cover, use rhinestones or even slap on a name sticker for a minimalistic look. If you get your hands on rustic ribbons, you could wrap them around the front flap of the journal along the opening for bohemian vibes. 

With a journal that screams your name, you're ready to fill it up with memories, notes, and whatever your heart desires. Don't forget to show off your cool new journal! 

Maisha Maliha speaks what crosses her mind in the most positive way but is often misinterpreted and thought to be a lunatic. Unfollow her at www.facebook.com/MyshoeMaliha

Comments

নির্বাচনের ঘোষণাকে স্বাগত, হাসিনার গুমের সম্পৃক্ততা তদন্তে সমর্থন যুক্তরাষ্ট্রের

বুধবার স্টেট ডিপার্টমেন্টের নিয়মিত ব্রিফিংয়ে বাংলাদেশ প্রসঙ্গে সাউথ এশিয়া পার্সপেক্টিভস’র স্টেট ডিপার্টমেন্ট করেসপন্ডেন্ট আব্দুর রহিমের করা এক প্রশ্নের জবাবে নির্বাচনের ঘোষণাকে স্বাগত জানান...

১ ঘণ্টা আগে